第一章 Java 概述
Java 是1995年Sun公司退出的一个完全面向对象、跨平台的编程语言
面向对象的三大特性:继承、封装、多态
JDK 提供了编译和运行Java程序的命令,位于 JDK 安装路径的 bin 目录下,具体有:javac、java、javadoc
Java 编译之后形成与操作系统无关的字节码,字节码再经过 Java 虚拟机 (JVM) 解释成可执行的目标代码
Java语言的主要特点:面向对象、解释执行、平台无关
第二章 Java 语法基础
数据类型
原始数据类型
- byte
- short
- int
- long
- float
- double
- char
- boolean
引用数据类型
变量
命名规则
- 标识符必须以字母、下划线、$符号开头
后面可跟任意数量的字母、数字、下划线或$符号
- 不能使用关键字
- 标识符长度没有限制
- 区分大小写
作用域和生存期
变量可以在代码块中声明
代码块以左大括号开始,以右大括号结束
代码块用来定义变量的作用域
每次创建一个新块后,就会创建一个新的作用域
变量的作用域是一个作用的范围,每个变量都有自己的作用域
变量的生存期是指变量的生存周期
运算符
| 运算符 |
示例 |
| 算术运算符 |
++,–,+, -,*, /,% 等 |
| 关系运算符 |
>,>=,<,<=,==,!= |
| 逻辑运算符 |
&&, |
| 条件运算符 |
?: |
| 赋值运算符 |
=,+=,-=,*=,/=,%= |
| 位运算符 |
>>,<<,>>>,&,|,^,~ |
优先级
| 顺序 |
运算符 |
| 1. |
括号,如 ( ) 和 [ ] |
| 2. |
一元运算符,如 -、++、- -和 ! |
| 3. |
*算术运算符,如 、/、%、+ 和 - |
| 4. |
关系运算符,如 >、>=、<、<=、== 和 != |
| 5. |
**逻辑运算符,如 &、^、|、&&、|| ** |
| 6. |
条件运算符和赋值运算符,如 ? :、*=、*=、/=、+= 和 -= |
程序流控制语句
判断语句
1
2
3
4
5
6
7
8
9
10
11
12
13
14
15
16
17
|
if (condition) {
} else if (condition) {
} else {
}
switct (var) {
case 1:
break;
case 2:
break;
default:
}
|
循环语句
1
2
3
4
5
6
7
8
9
10
11
12
13
14
15
16
17
18
19
|
while (condition) {
}
do {
} while (condition);
for (int i = 0; i < 10; i++) {
}
for (int i : array) {
}
|
跳转语句
break
用于终止块。将 break 关键字引入循环,避免不必要的循环语句执行,终止循环
continue
有时程序员可能希望继续循环,而停止处理其主体内的其余代码,以进行特定的迭代。continue 语句可用于这种操作。
数组
数组是保存相同数据类型的数据的集合。
数组的主要优势在于它用一个变量名保存多个数据,是一种可以轻松操作数据的方法把数据组织起来。
1
2
3
4
5
6
|
int[] a;
int[] a = new int[5];
int[] a = {1, 2, 3};
|
第三章 面向对象编程
OOP
- 旨在在计算机程序中、模拟现实世界中的概念
- 在 OOP中,现实世界的所有事物全都被视为对象
- 能够在计算机程序中用类似的实体模拟现实世界中的实体
- 设计和实现软件系统的方法
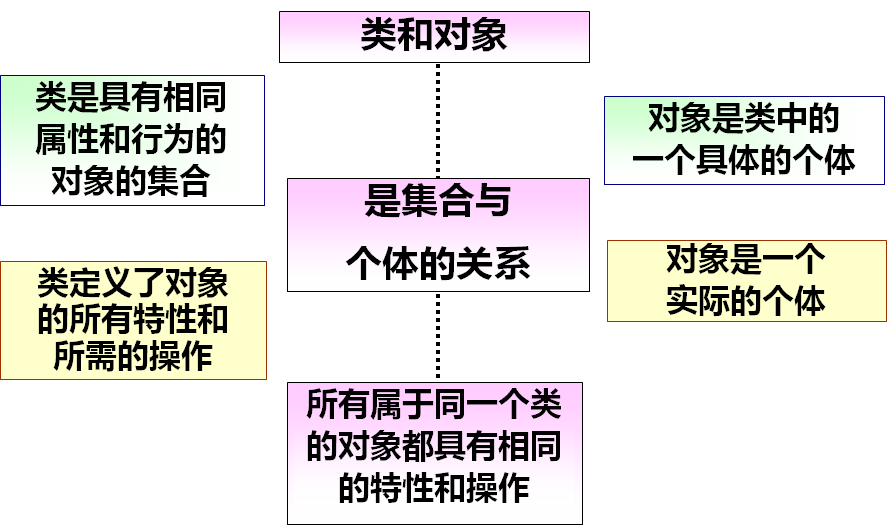
对象
对象是具有属性和行为的一个具体实体。
属性(状态)
事物的特性在类中表示为实例变量
每个对象的每个属性都拥有其特有的值
属性名称由类的所有实例(对象)共享
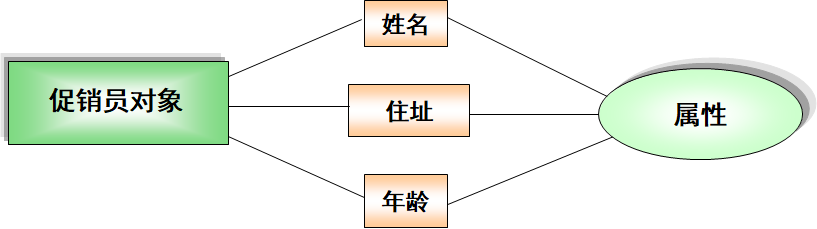
方法(行为)
Java中对象执行的行为操作称为方法,相当于C语言的函数。
类和对象的关系
在Java中定义类和创建对象
1
2
3
4
5
6
7
8
9
10
11
12
13
14
15
16
17
18
19
20
21
22
23
24
25
26
27
28
29
30
31
32
33
34
35
36
37
38
39
40
41
42
43
44
45
46
47
48
49
50
51
| class Student {
String name;
int age;
Student(){
}
Student(String name, int age){
this.name = name;
this.age = age;
}
String getName () {
return name;
}
void setName(String name) {
this.name = name;
}
int getAge() {
return age;
}
void setAge(int age) {
this.age = age;
}
}
Student student = new Student();
Student student = new Student("张三", 12);
student.setName("李四");
student.getName();
|
包
包允许将类组合成较小的单元(类似文件夹),使其易于找到和使用相应的类文件。
有助于避免类的命名冲突。
包允许在更广的范围内保护类、数据和方法,可以在包内定义类,而在包外的代码不能访问该类 。
1
2
3
4
5
|
package 包名;
import 包名.类名;
|
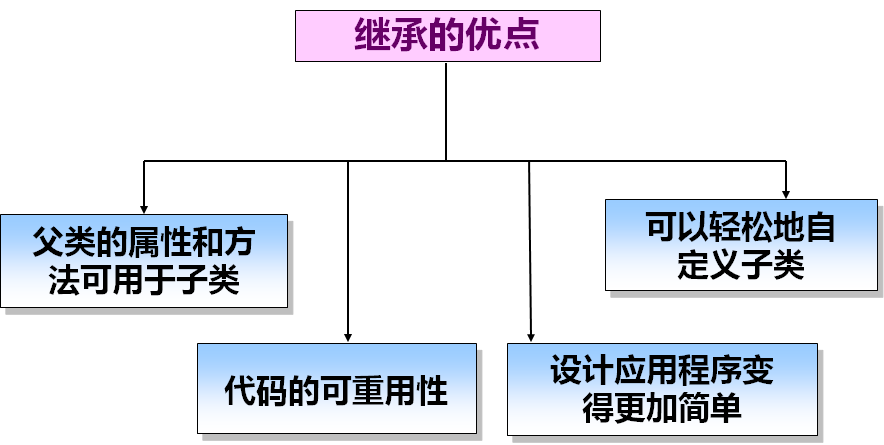
继承
除了继承父类的成员,子类也可以有自己的属性和方法。
父类的私有属性子类可以继承,但是无法访问,可以通过父类的方法来访问
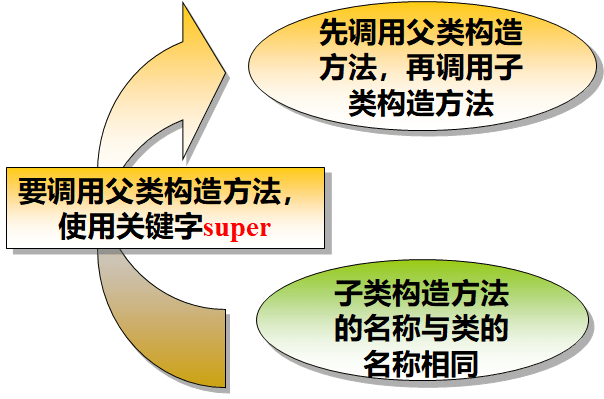
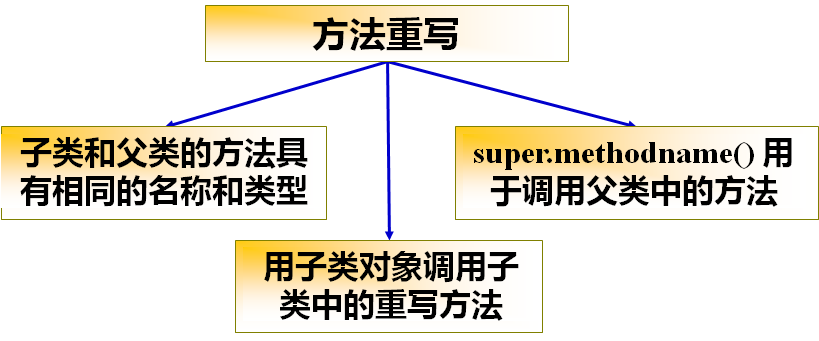
父类的构造方法不能被子类继承,但是可以使用super关键字调用父类的构造方法
父类构造方法的调用总是先于子类构造方法
super()语句必须是子类构造方法的第一句
super()方法始终指向调用类的直接父类
多态
是面向对象三大特性质之一。
多态是指一个程序中同名的不同方法共存的情况。
面向对象的程序中多态的情况有多种,可以用在同一个类中定义多个同名的不同方法(方法重载),也可以通过子类对父类方法的覆盖实现多态(方法重写)。
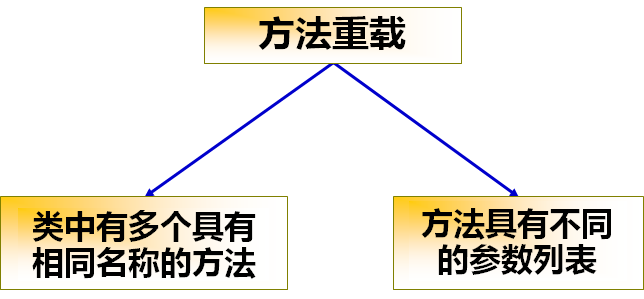
方法重载
同一个类中,有两个或多个方法名称相同、参数不同(参数的数据类型不同、或参数的个数不同,或参数的顺序不同) ,则这些方法重写构成重载。
1
2
3
4
5
6
7
8
9
10
11
12
13
14
15
16
17
18
19
20
21
22
23
24
25
26
27
28
29
30
31
32
33
34
35
36
| public class DisplayNumber {
void display() {
System.out.println("无参数可显示!");
}
void display(int num, int num1) {
System.out.println("两个整数是:" + num + " " + num1);
}
public static void main(String [ ] arg) {
int count = 25;
DisplayNumber dispObj = new DisplayNumber();
dispObj.display();
dispObj.display(10 , 20);
System.out.println(
"调用 display(double) 方法,"
+ "使用 int 变量: " + count
);
dispObj.display(count);
dispObj.display(25.5);
}
void display(double count) {
System.out.println("在 display(double)方法内:" + count);
}
}
|
方法重写
子类中有一个方法和父类的方法名称相同、参数相同(参数的数据类型相同、参数的个数相同) 、返回值相同,则子类的这个方法重写父类的方法。
1
2
3
4
5
6
7
8
9
10
11
12
13
14
15
16
17
18
19
20
21
22
23
24
25
26
27
28
29
| class Rectangle {
int length;
int width;
Rectangle(){
}
Rectangle(int len , int wid) {
length = len;
width = wid;
}
void getPerimeter() {
System.out.println("矩形的周长为" + (2 * (length + width)));
}
}
class Square extends Rectangle {
Square(int len) {
length = len;
}
void getPerimeter() {
System.out.println("正方形的周长为" + (4 * length));
}
}
|
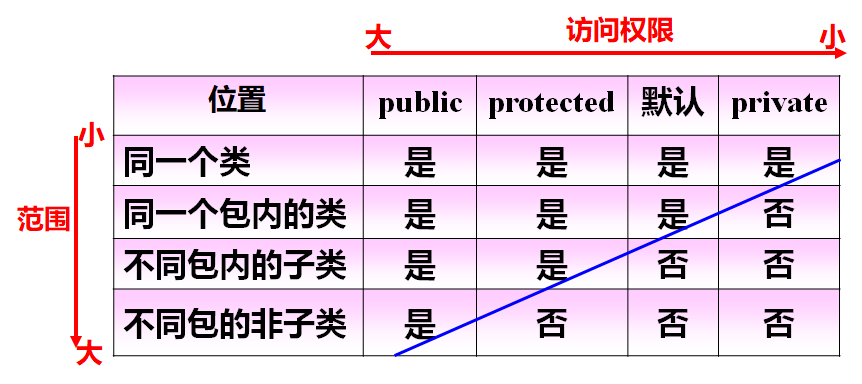
访问修饰符
public
该类或非该类,均可访问。
private
只有该类,可以访问。
protected
该类及其子类的成员可以访问,同一个包中的类也可访问。
默认
同包中的类,可以访问。
访问修饰符可访问性
子类重写父类的方法时,子类方法的访问修饰符不得低于被重写的父类方法的访问修饰符。
特殊修饰符
static
static 修饰符修饰的变量称为静态变量(普通的属性称为实例变量)
static 修饰符修饰的方法称为静态方法(普通的方法称为实例方法)
静态变量和静态方法不依赖对象而存在,可通过类名打点直接访问,如:
类名.静态变量
类名.静态方法( )
规 则:
- 只能调用其他静态方法
- 只能访问静态数据
- 不能使用super或this关键字
1
2
3
4
5
6
7
8
9
10
11
12
13
14
| class InchesToFeet{
public static double convert(double in) {
return (in / inches);
}
}
class Test {
public static void main(String [] arg) {
double inch = 66;
double feet = InchesToFeet.convert(inches);
System.out.println(inch + "英寸为" + feet + "英尺。");
}
}
|
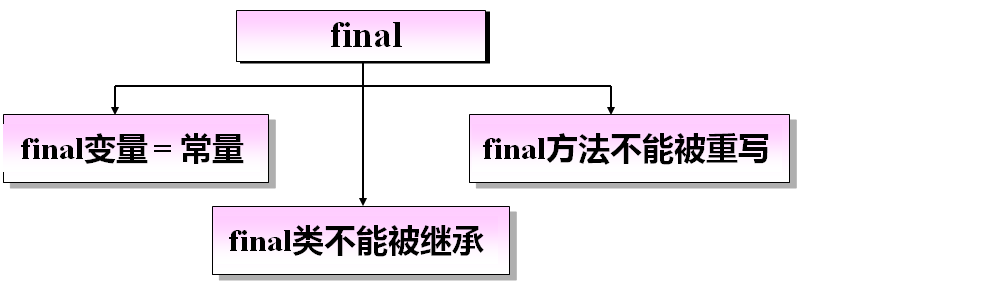
final
final 修饰符可应用于类、方法和变量。
final在应用于类、方法和变量时意义是不同的,但本质是一样的:final表示不可改变。
声明为final的类不能被继承;声明为final的方法不能被重写;声明为final的的变量为常量;
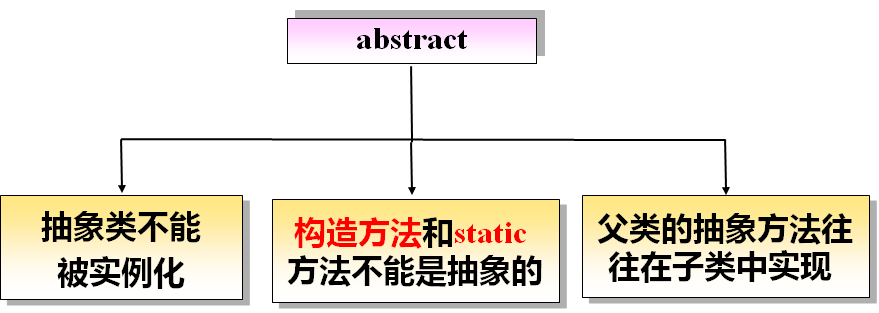
abstract
abstract修饰的方法叫抽象方法,没有方法体
abstract修饰的类叫抽象类,不可以实例化
含有抽象方法的类必须声明为抽象类
定义抽象方法的语法:
abstract 返回值类型 方法名称 (参数列表);
定义抽象类的语法:
1
2
3
| abstract class ClassName {
}
|
使用:父类中的某些抽象不包含任何逻辑,并需要在子类中重写,子类提供这种抽象方法的实现细节
1
2
3
4
5
6
7
8
9
10
11
12
13
14
15
16
17
18
19
20
21
| abstract class Shape {
protected double length;
protected double width;
abstract double area();
}
class Square extends Shape {
Square(final double num, final double num1) {
super(num, num1);
}
double area() {
System.out.println("正方形的面积为:");
return length * width;
}
}
|
接口
接口就是某个事物对外提供的一些功能的声明。
可以利用接口实现多态,同时接口也弥补了Java单一继承的弱点。
使用interface关键字定义接口。
一般使用接口声明方法或常量,接口中的方法只能是声明,不能是具体的实现。
1
2
3
4
5
6
7
8
9
10
11
12
13
14
15
16
17
18
|
public interface MyInterface {
void add(int x, int y);
void volume(int x, int y, int z);
}
public interface MyConstants {
double price = 1450.00;
int counter = 5;
}
class demo implements MyInterface {
}
|
第四章 异常
程序在运行过程中产生错误的现象叫做异常。
异常是一种运行时错误,它是程序在运行时,由于系统检测到了不可能执行的操作而引起的。
异常处理机制
1
2
3
4
5
6
7
8
9
10
11
12
13
14
15
16
17
18
19
20
21
22
23
24
25
26
27
28
29
30
31
32
| class Test {
public static void main(String[] args) {
try {
doSomething();
throwException();
throw new Exception("手动抛出异常");
try {
doSomething();
} catch (Exception e) {
}
} catch (ArrayIndexOutOfBoundsException e) {
} catch (Exception e) {
} finally {
}
}
public static void throwException() throws Exception {
}
}
|
异常类
| 异 常 |
说 明 |
| Exception |
异常层次结构的根类 |
| RuntimeException |
许多 java.lang 异常的基类 |
| ArithmeticException |
算术错误情形,如以零作除数 |
| ArrayIndexOutOfBoundsException |
索引小于或大于实际的数组大小 |
| NullPointerException |
尝试访问 null 对象成员 |
| ClassNotFoundException |
不能加载所需的类 |
| NumberFormatException |
数字转化格式异常 |
| IOException |
I/O 异常的根类 |
| FileNotFoundException |
找不到文件 |
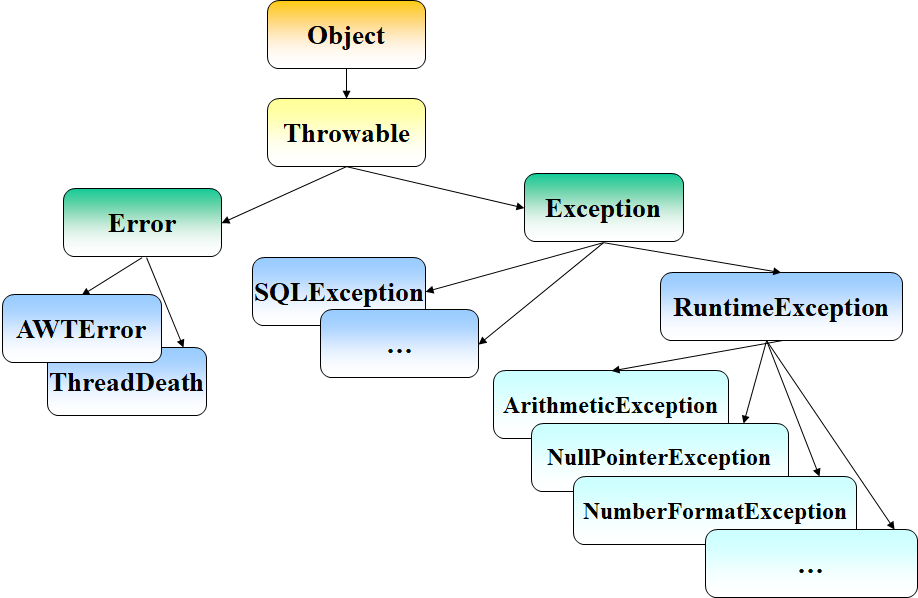
层次结构
Throwable 具有两个子类,它们是
Exception:处理用户程序应当捕获的异常情况
Error:Error 类的异常为内部错误,因此在正常情况下不期望用户的程序捕获它们
finally 块
无论是否发生异常,finally块里的代码一定会执行,一般用于释放不需要使用的内存空间。
自定义异常
自定义异常概念:使用自定义异常的时候,JavaAPI 提供的内置异常不一定总能捕获程序中发生的所有错误。有时会需要创建用户自定义异常 。
1
2
3
4
5
6
7
|
class CustomException extends Exception {
CustomException () {
super("自定义异常");
}
}
|
检验异常和非检验异常
检验异常是指程序代码中必须要捕获的异常,否则无法通过编译。
非检验异常是可以不捕获程序仍可以通过编译的异常。
RuntimeException 及其子类都属于非检验异常,其它异常均为检验异常。
断言
JDK1.4版本引入的新特性,允许程序员在代码中加入一些检查语句而无需编写异常处理程序。主要用于调试的目的。
非常简单
assert (布尔表达式)
简单
assert (布尔表达式) : “字符串表达式”
第五章 java.lang 包和字符串
java.lang 包
每当创建 java 程序,在编译和运行时JVM会自动导入 java.lang 包,无需使用 import 来手动导入。
基本数据类型和包装类
Java为每一种基本数据类型都提供一个对应的包装类。
| 基本数据类型 |
包装类 |
| byte |
Byte |
| short |
Short |
| int |
Integer |
| long |
Long |
| float |
Float |
| double |
Double |
| char |
Character |
| boolean |
Boolean |
字符串
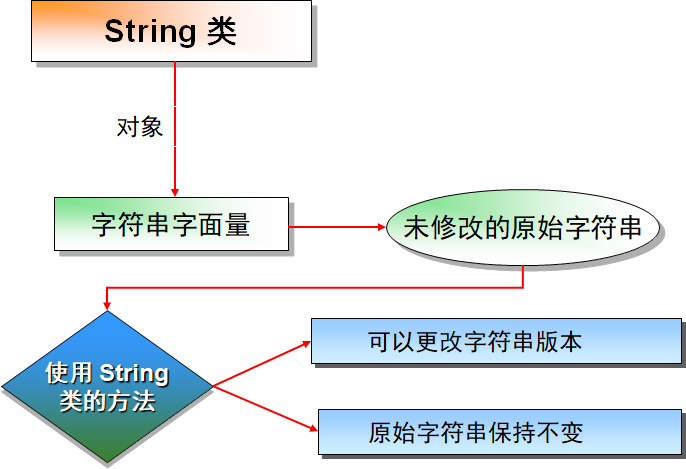
String 类
String类代表的字符串是不可变的,也就是说字符串是常量并且不能改变它们的。
StringBuffer 类
StringBuffer 用于表示可以修改的字符串使用连接运算符 (+) 的字符串会自动创建字符串缓冲对象。
| 构造方法 |
说明 |
| public StringBuffer() |
保留 16 个字符的空间 |
| public StringBuffer (int length) |
设置缓存器大小 |
| public StringBuffer(Stringvalue) |
接收字符串参数,用来设置初始内容,并在不重新分配的情况下保留 16 个字符的空间 |
| 方法 |
说明 |
| StringBuffer insert(int n,String s) |
在指定位置插入字符串 |
| int length( ) |
确定 StringBuffer 对象的长度 |
| void setCharAt(int pos, char ch) |
使用 ch 指定的新值设置 pos 指定的位置上的字符 |
| String toString( ) |
转换为字符串形式 |
| StringBuffer reverse() |
反转 StringBuffer 对象中的字符 |
| StringBuffer delete(int start, int end) |
此方法将删除调用对象中从 start 位置开始直到 end 指定的索引 – 1 位置的字符序列 |
| StringBuffer deleteCharAt(int pos) |
此方法将删除 pos 指定的索引处的字符 |
| StringBuffer replace(int start, int end, String s) |
此方法使用一组字符替换另一组字符。将用替换字符串从 start 指定的位置开始替换,直到 end 指定的位置结束 |
第六章 java.util 包、集合框架和泛型
java.util 包
Date
| 构造方法 |
说明 |
| Date() |
使用当天的日期创建 Date |
| Date(long date) |
使用自 1970 年 1 月 1 日0时0分0秒以后的指定毫秒数创建Date** |
Calendar
根据给定的 Date 对象,Calendar 类可以以 YEAR 和 MONTH 等整型的形式检索信息
它是抽象类,因此不能实例化
1
2
3
4
5
6
7
8
9
10
11
|
Calendar c = Calendar.getInstance();
GregorianCalendar gc = new GregorianCalendar();
gc.set(Calendar.DAY_OF_MONTH, 1);
int weekday = gc.get(Calendar.DAY_OF_WEEK);
|
Random
| 构造方法 |
说明 |
| Random() |
创建一个新的随机数生成器。 |
| Random( long seed) |
使用单个 long 种子创建一个新的随机数生成器 |
1
2
3
4
5
6
7
8
9
10
| Random random = new Random();
random.nextInt();
random.nextInt(n);
random.nextDouble();
|
集合框架
集合用于存储、检索和操纵数据
集合框架是用于表示和操纵集合的统一体系结构
三要素
- 接口:是表示集合的抽象数据类型
- 算法:是对实现接口的对象执行计算的方法
- 实现:是接口的实际实现
优点
- 提供有用的数据结构和算法,从而减少编程工作
- 提高了程序速度和质量,因为它提供了高性能的数据结构和算法
- 允许不同 API 之间的互操作,API之间可以来回传递集合
- 可以方便地扩展或改写集合
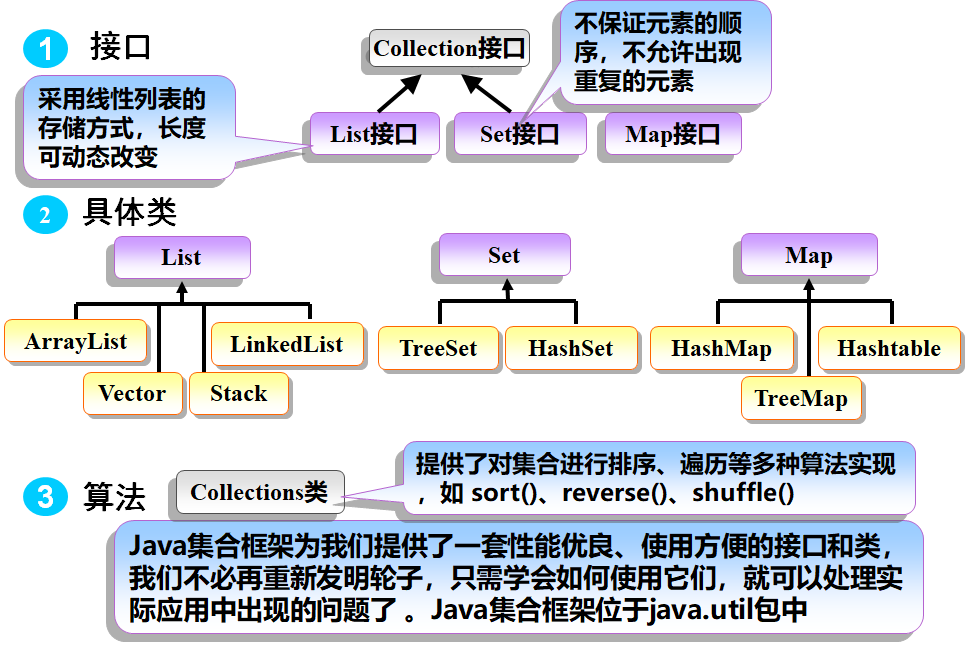
List
元素以线性方式存储存储的顺序与添加的顺序相同。
特点
常用的实现该接口的类
ArrayList —— 类似数组
ArrayList 对象是长度可变的对象引用数组,类似于动态数组
继承 AbstractList 并实现 List 接口
随着元素的添加,元素的数目会增加,列表也会随着扩展
访问和遍历对象时,它提供更好的性能
| 构造方法 |
说明 |
| ArrayList() |
创建一个空 Arraylist |
| ArrayList(Collection c) |
根据给定集合的元素创建数组列表 |
| ArrayList(int size) |
使用给定大小创建一个数组列表。向数组列表添加元素时,此大小自动增加 |
Vector —— 矢量
它具有类似数组的数据结构,而且是动态的
可以存放一定数量的元素
容量可以递增
原始数据类型不能添加到 Vector 中
LinkedList —— 链表
Stack —— 堆栈(LIFO)
Map
以键-值的映射来存储元素,键值不允许重复。
| 类名 |
null |
元素顺序 |
线程安全 |
| HashMap |
允许null键和值 |
不保证元素的顺序 |
线程不安全 |
| Hashtable |
不允许有null键和值 |
不保证元素的顺序 |
线程安全 |
| TreeMap |
不允许有null键 |
可以按键的自然顺序将值排序 |
|
HashMap
存放键/值时允许值为null 值
| 构造方法 |
说明 |
| HashMap() |
创建一个具有默认容量和负载系数的空映射 |
| HashMap(int size) |
创建一个具有指定大小的容量和默认负载系数的空映射 |
| HashMap(int size, float load) |
创建一个具有指定的容量和指定的负载系数的空映射 |
| HashMap (Map map) |
创建一个具有指定 map 映射的散列映射 |
1
2
| HashMap map = new HashMap();
map.put("name", null);
|
Set
不保证元素的顺序,不允许重复元素。
特点
- Set接口不保证元素的顺序,不允许出现重复的元素
- 实现Set接口的类:HashSet、TreeSet
- HashSet类不允许出现重复元素,不保证集合中元素的顺序,只允许一个null元素。
- TreeSet是Set的一种变体,可以实现按照自然顺序排序。在添加元素时会自动将其插入到已经有序的元素序列中。
- 字符串按照“字典”的顺序
- 整数按照数字大小的顺序
HashSet和TreeSet的区别:HashSet不保证元素的顺序,而TreeSet可以自然顺序插入添加的元素
Iterator
Iterator接口可以以统一的方式对各种集合元素进行遍历,也称为“迭代器”。它还可以在遍历元素的同时移除元素。
| 方法 |
说明 |
| hasNext() |
方法检测集合中是否还有下一个元素 |
| next() |
方法返回集合中的下一个元素 |
Iterator遍历集合元素的语法:
1
2
3
4
5
6
7
| ArrayList<String> collection = new ArrayList<String>();
Iterator it = collection.iterator();
while(it.hasNext()) {
String string = it.next();
System.out.println(string);
}
|
Comparable
Java.lang 包中定义的一个比较对象的接口
提供抽象方法 compareTo(),可以对对象进行整体排序。
使用方法:对要进行比较对象的类实现 Comparable 接口,重写 compareTo() 方法
Comparable接口不仅仅用于集合框架,可用于任何需要进行对象比较的场合。
1
2
3
4
5
6
7
8
9
10
| class Student implements Comparable {
String name;
public int compareTo(Object obj) {
Student s = (Student) obj;
return this.name.compareTo(s.name);
}
}
|
Comparator
Java.util 包中提供的一个对某个对象集合进行整体排序的比较接口
提供了compare 的比较方法来比较对象
使用步骤:
- 定义实现该接口的类(该类又称为比较器),并重写
compare 方法
- 实例化该比较器类的对象把该对象作为
Collections.sort( ) 方法的第二个参数。
- 把该对象作为
Collections.sort() 方法的第二个参数。
1
2
3
4
5
6
7
8
9
10
11
12
13
14
15
16
17
18
19
20
21
22
|
class NameComparator implements Comparator{
public int compare(Object o1, Object o2){
Student s1 = (Student) o1;
Student s2 = (Student) o2;
return s1.name.compareTo(s2.name);
}
}
class Test {
public static void main (String[] args) {
ArrayList<Student> students = new ArrayList<Student>();
students.add(new Student("张三"));
students.add(new Student("李四"));
NameComparator nameComparator = new NameComparator();
Collections.sort(students, nameComparator);
}
}
|
泛型
优点
- 保证集合中所有元素的数据类型相同
- 从泛型集合中取出元素时无需再做类型转换
- 向集合中添加不符合指定类型的数据,编译时会发生错误信息,避免运行时错误的发生
- 是原有Java类型体系的扩充,是编译时的保护。
- 可以提高Java应用程序的安全性、可维护性和可靠性。
泛型类
类的定义可在类名后面用尖括号括起一个类型参数。这种由类型参数修饰的类被称为泛型类。泛型类也属于引用类型。
1
2
3
4
5
6
7
8
9
10
11
12
13
14
15
16
17
18
19
20
21
| public class GenericList <T> {
private T item;
public <T> setItem(T obj) {
}
public T getItem(){
}
}
GenericList<String> list = new GenericList<String>();
|
限制类型参数
实例化泛型类时,可以将类型参数T的位置用任意的引用类型代替。
如果要求该类型参数是某一父类的子类时,受限的类型参数可以兼顾通用性和针对性:
1
2
3
4
|
public class Point<T extends Number>{
}
|
使用泛型方法和泛型类
什么时候使用泛型方法,而不是泛型类呢?
- 添加类型约束只作用于一个方法的多个参数之间、而不涉及到类中的其他方法时,使用泛型方法
- 施加类型约束的方法为静态方法,只能将其定义为泛型方法,因为静态方法不能使用其所在类的类型参数。
接口
Iterator<T> 可以在使用迭代器遍历集合元素时无需类型转换
Comparable<T> 和 Comparator<T>,其使用和以前一样,只是多了泛型的安全机制
类型通配符
同一个泛型类与不同的类型参数复合而成的类型之间并不存在继承的关系
1
2
3
4
5
6
7
8
9
10
11
12
| class Person{
}
class Student extends Person{
}
public class GenericDemo {
public static void main (String[] args) {
Vector<Person> v=new Vector<Student>();
}
}
|
Vector<?> 是任何泛型类Vector的父类
Vector<?> 类型的变量在调用方法时有限制—凡是必须知道具体类型参数才能进行的操作均被禁止。
如:Vector<?> 的对象禁止调用 add() 方法。但并不等于是“只读”,例如可以执行remove()方法。
上限通配符
类型通配符?之后可以加 extends 来限制参数类型只能为某个类的子类
1
2
3
4
|
public void show(Vector<? extends Number> v){
}
|
下限通配符
下限类型通配符 <? super 类名> 可以限制参数类型只能为某个类或其父类。允许添加该类的对象,因此该类的子类对象也可以添加。
1
2
| public void show(Vector<? super Number> v){
}
|
File 类
1
2
3
4
5
6
7
8
9
10
11
12
13
14
15
| import java.io.File;
class Test {
public static void main(String[] args) {
File file = new File(args[0]);
System.out.println("文件或目录是否存在:" + file.exists());
System.out.println("是文件吗:" + file.isFile());
System.out.println("是目录吗:" + file.isDirectory());
System.out.println("名称:" + file .getName());
System.out.println("路径: " + file.getPath());
System.out.println("绝对路径: " + file.getAbsolutePath());
System.out.println("最后修改时间:" + file.lastModified());
System.out.println(“文件大小:” + file.length() + “ 字节”);
}
}
|
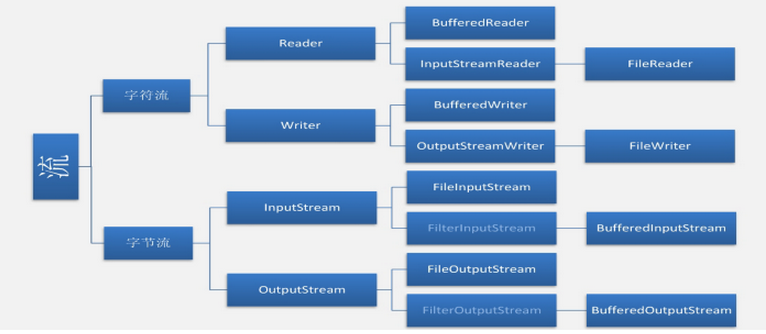
流
流是指一连串流动的字符,是以先进先出方式发送信息的通道
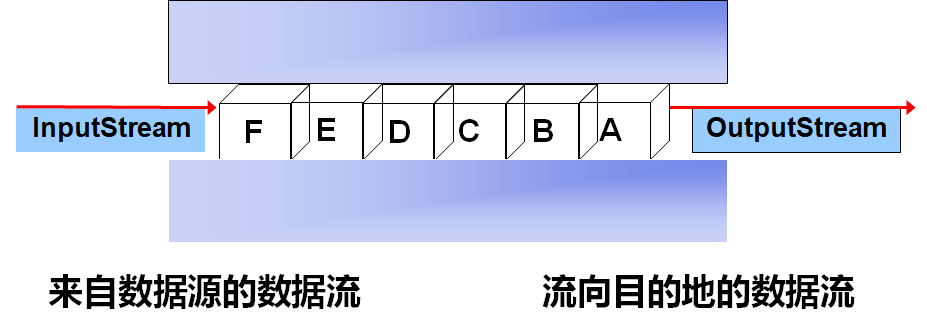
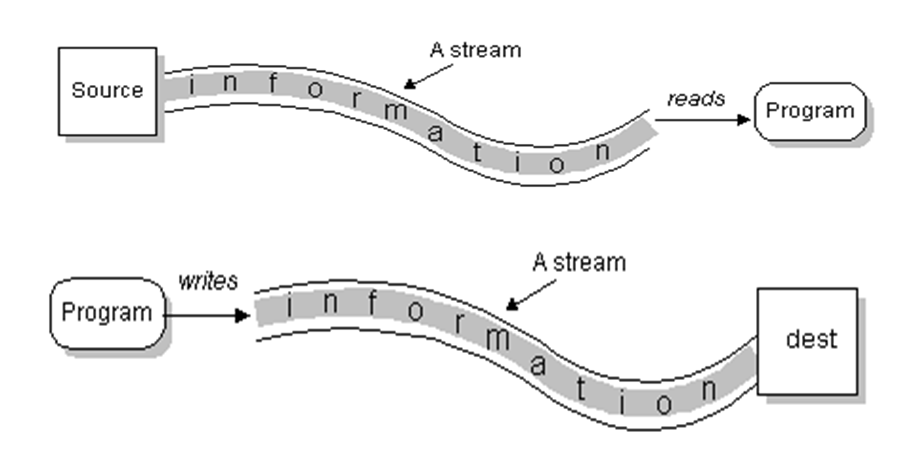
分类
字节流(8 位):InputStream OutputStream
字符流(16 位): Reader Writer
文件读写
1
2
3
4
5
6
7
8
9
10
11
12
13
14
15
16
17
18
19
20
21
22
23
24
25
26
27
28
29
30
31
32
33
34
35
36
37
38
39
40
41
42
43
44
45
46
47
48
49
50
51
52
53
54
55
56
57
58
59
60
61
62
63
64
65
66
67
68
69
70
71
72
73
74
75
76
77
78
79
80
81
82
83
84
85
| class Test {
public static void main (String[] args) {
try{
int size;
InputStream fis = new FileInputStream("text.txt");
System.out.println("可读取的字节数: " +
(size = fis.available()));
char[] text = new char[200];
for (int count = 0; count < size; count++) {
text[count] = ((char) fis.read());
System.out.print(text[count]);
}
fis.close();
}catch(IOException e){
System.out.println (e.getMessage());
}
try {
String str ="好好学习Java";
byte[] words = str.getBytes();
OutputStream fos = new FileOutputStream("Text.txt");
fos.write(words, 0, words.length);
System.out.println("Text文件已更新!");
fos.close();
} catch (IOException e) {
System.out.println("创建文件时出错!");
}
try {
FileReader fr = new FileReader("mytest.txt");
BufferedReader br = new BufferedReader(fr);
String line = br.readLine();
while(line! = null){
System.out.println(line);
line = br.readLine();
}
br.close();
fr.close();
} catch(Exception e) {
}
try {
FileWriter fw = new FileWriter("mytest.txt");
BufferedWriter bw = new BufferedWriter(fw);
bw.write("大家好!");
bw.write("我正在学习BufferedWriter。");
bw.newLine();
bw.write("请多多指教!");
bw.newLine();
bw.write("email: [email protected]");
bw.flush();
fw.close();
} catch (Exception e) {
}
}
}
|
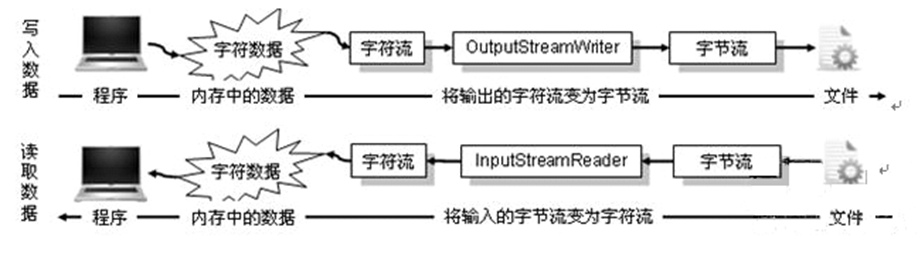
字节流到字符流的转换
InputStreamReader:是Reader的子类,将一个字节流的输入对象变为字符流的输入对象。
OutputStreamWriter:是Writer的子类,将一个字符流的输出对象变为字节流输出对象。
格式化输出流 PrintWriter
PrintWriter提供了 print()、println()、format() 等一系列方法,来格式化输出字符流。
1
2
3
4
5
6
7
8
9
| PrintWriter pw = new PrintWriter("demo.txt");
pw.println("将信息写入文件");
pw.write("将信息写到文件中\r\n");
pw.write(65);
pw.printf(“%f”,3.14159263423);
pw.printf("%.2f",3.14159263423);
|
缓冲输入输出流
主要方法:
read(buffer)
read(byte[ ] b, int off, int len)
BufferedOutputStream 类
由于 BufferedOutputStream 是缓冲数据的,所以必要时,需要使用flush方法强制将缓冲中的数据真正写入输出流中。
主要方法:
write(buffer,off,length)
第八章 JDBC 数据库编程
java.sql 包
| 接口名 |
说明 |
| Connection |
此接口表示与数据的连接 |
| Statement |
此接口用于执行 SQL 语句并将数据检索到 ResultSet 中 |
| ResultSet |
此接口表示了查询出来的数据库数据结果集 |
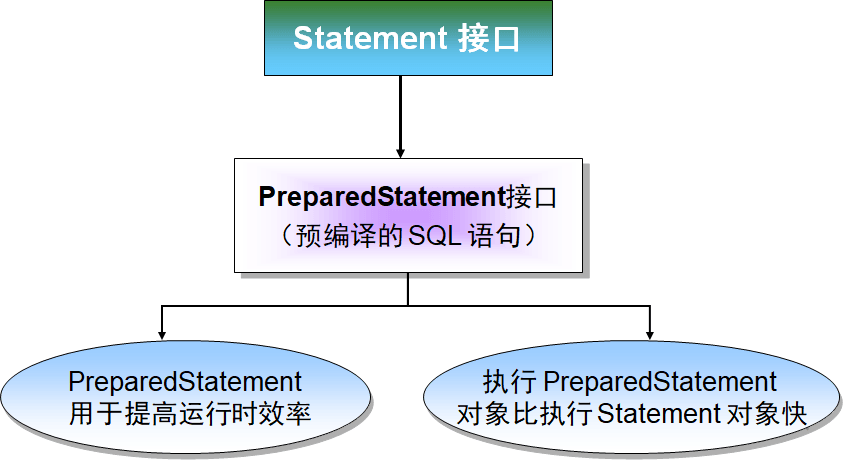
| PreparedStatement |
此接口用于执行预编译的 SQL 语句 |
| DriverManager |
此类用于加载和卸载各种驱动程序并建立与数据库的连接 |
JDBC 程序访问数据库的步骤
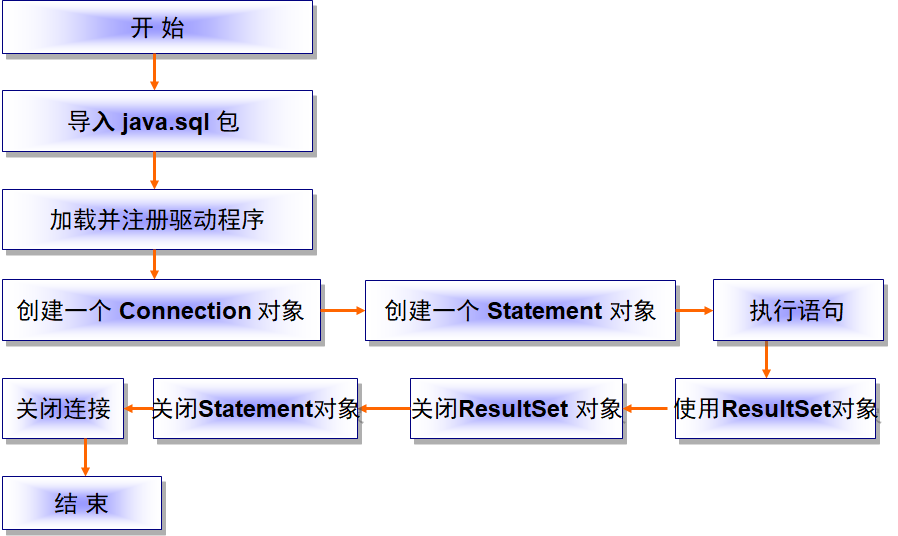
1
2
3
4
5
6
7
8
9
10
11
12
13
14
15
16
17
18
19
20
21
22
23
24
25
26
27
28
29
30
31
32
33
34
35
| import java.sql.*;
class Test {
public static void main(String[] args) {
try {
Class.forName("com.microsoft.sqlserver.jdbc.SQLServerDriver");
String url = "jdbc:sqlserver://127.0.0.1:1433;databaseName=DB";
String dbUser = "sa";
String dbPassword = "1234";
Connection conn = DriverManager.getConnection(url, dbUser, dbPassword);
Statement stmt = conn.createStatement();
ResultSet rs = stmt.executeQuery("select * from friends");
while (rs.next()) {
System.out.print(rs.getString(1) + "\t");
}
String sql = "INSERT INTO Student (id, name, address) VALUES ('001', '朱八', '深圳')";
int rowCount = stmt.executeUpdate(sql);
rs.close();
stmt.close();
conn.close();
} catch (Exception e) {
System.out.println(e.getMessage());
}
}
}
|
PreparedStatement
基于条件的 SQL 查询中使用 PreparedStatement,其中条件在参数中给出
1
2
3
4
5
6
7
8
9
10
11
12
13
14
15
16
17
18
19
20
21
22
23
24
25
26
27
28
29
30
| class class Test {
public static void main (String[] args) {
try {
Class.forName("com.microsoft.sqlserver.jdbc.SQLServerDriver");
String url = "jdbc:sqlserver://127.0.0.1:1433;databaseName=DB";
String dbUser = "sa";
String dbPassword = "1234";
Connection conn = DriverManager.getConnection(url, dbUser, dbPassword);
String sql = "INSERT INTO Student (id, name, address) VALUES (?, ?, ?)";
PreparedStatement pstmt = conn.prepareStatement(sql);
pstmt.setString(1, "001");
pstmt.setString(2, "朱八");
pstmt.setString(3, "深圳");
int rowCount = pstmt.executeUpdate();
pstmt.close();
conn.close();
} catch (Exception e) {
System.out.println(e.getMessage());
}
}
}
|
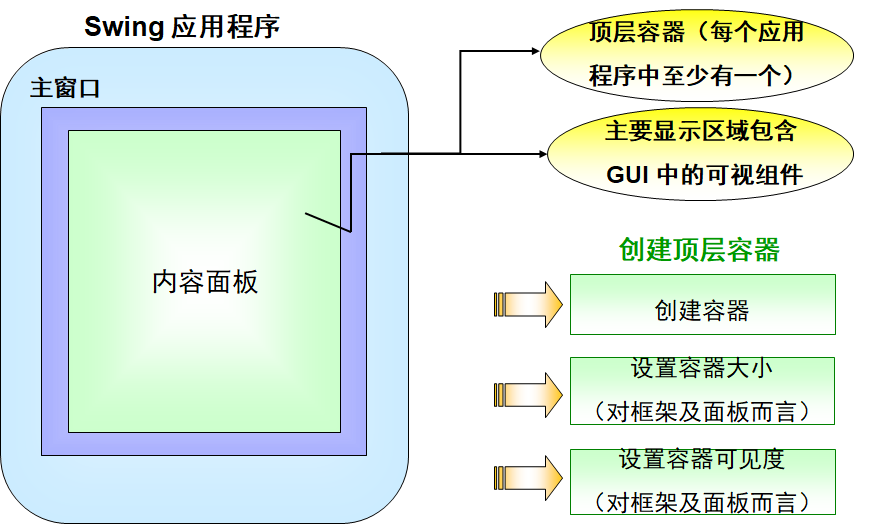
第九章 GUI 编程
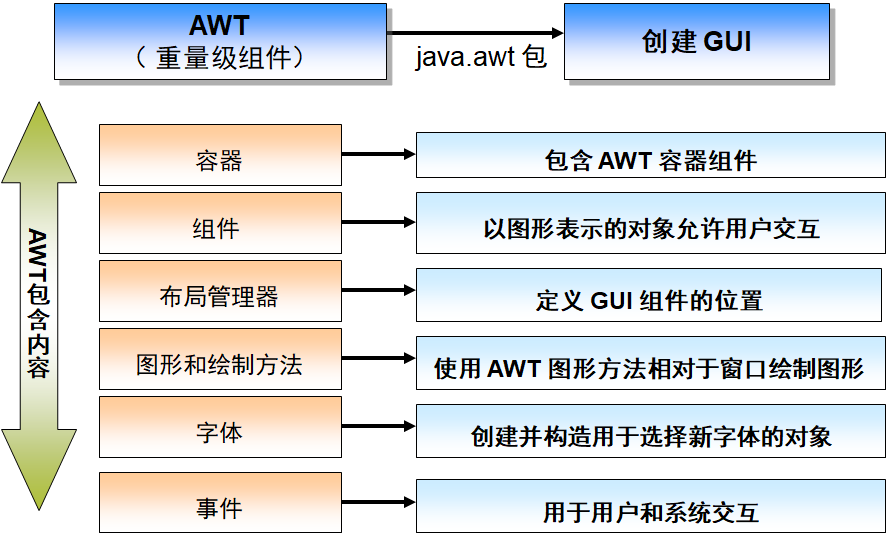
AWT
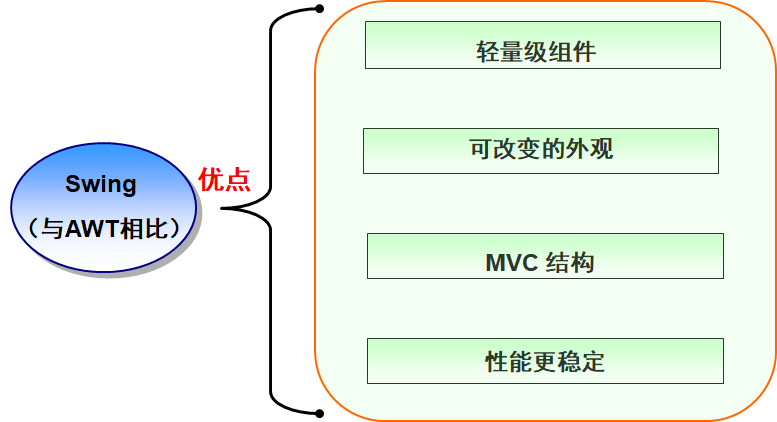
Swing

容器
JFrame
-
顶层容器
-
扩展 java.awt.Frame 类
-
用于在 Swing 程序中创建窗口
-
包含边框、标题和用于关闭和图标化窗口的按钮
JPanel
-
中间容器
-
用于将较小的轻量级组件组合在一起
-
与内容窗格相似,面板在默认情况下不透明
- 中间容器
- 管理视区、滚动条及可选的行和列的标题视区
组件
| 组件名 |
说明 |
| JLabel |
标签 |
| JTextField |
文本框 |
| JTextArea |
文本域 |
| JPasswordField |
密码框(内容不可见) |
| JRadioButton |
单选按钮(需添加到 ButtonGroup 中实现单选功能) |
| JCheckBox |
多选按钮 |
| JButton |
按钮 |
| JComboBox |
下拉列表 |
事件
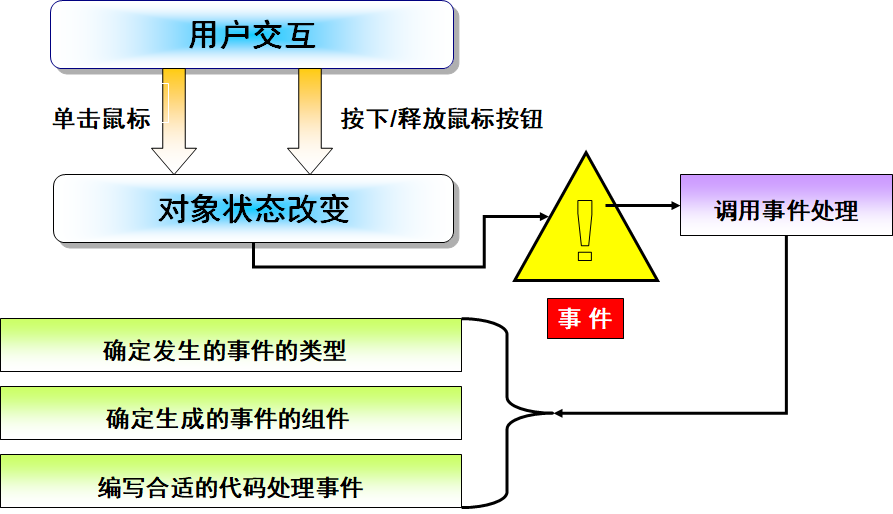
| 事件类 |
监听器接口 |
| ActionEvent |
ActionListener |
| AdjustmentEvent |
AdjustmentListener |
| ComponentEvent |
ComponentListener |
| FocusEvent |
FocusListener |
| ItemEvent |
ItemListener |
| WindowEvent |
WindowListener |
| TextEvent |
TextListener |
| MouseEvent |
MouseListener, MouseMotionListener |
| KeyEvent |
KeyListener |
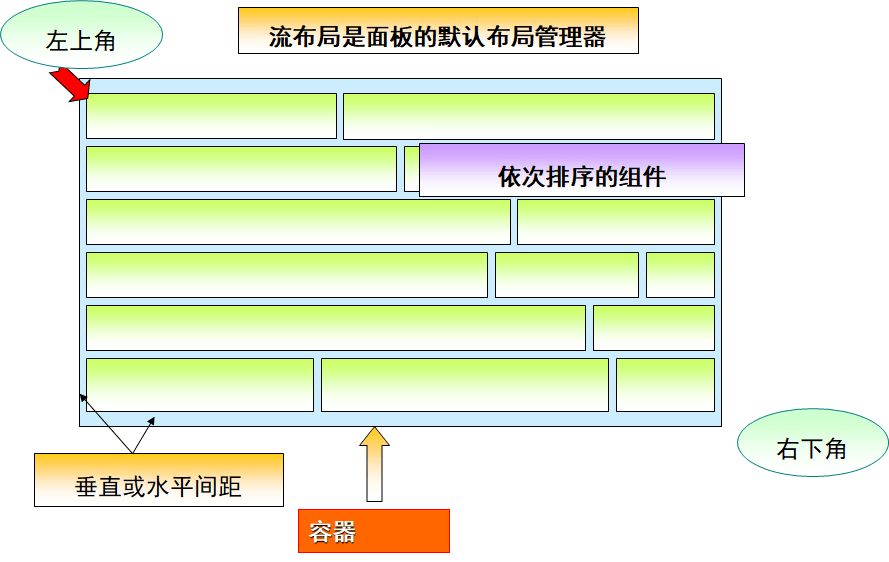
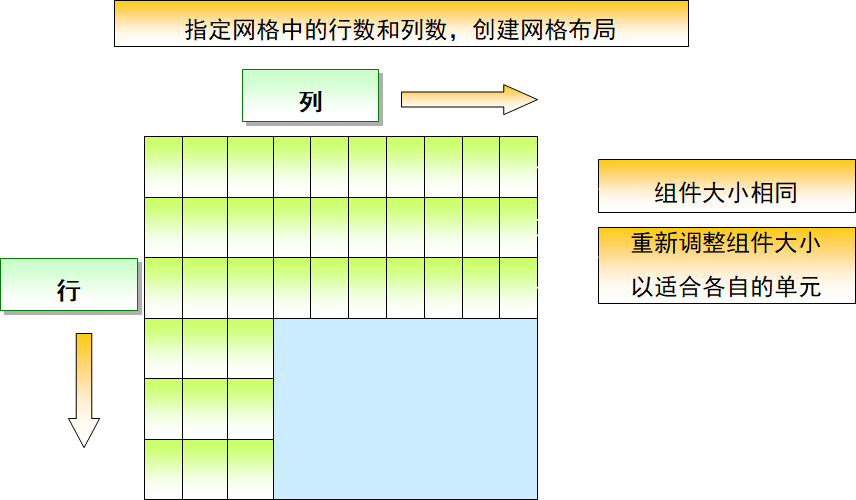
布局管理器
用户界面上的屏幕组件可以按照一定的格式布局,例如水平排列,或按网格方式排列
BorderLayout

1
2
3
4
5
6
7
8
9
10
11
12
13
14
15
16
17
18
19
20
21
22
23
24
25
26
27
28
| import javax.swing.JButton;
import javax.swing.JFrame;
import javax.swing.JLabel;
import javax.swing.JPanel;
import java.awt.*;
public class BorderLayoutDemo
{
public static void main(String[] agrs)
{
JFrame frame=new JFrame("BorderLayout Demo");
frame.setSize(400,200);
frame.setLayout(new BorderLayout());
JButton button1=new JButton ("上");
JButton button2=new JButton("左");
JButton button3=new JButton("中");
JButton button4=new JButton("右");
JButton button5=new JButton("下");
frame.add(button1,BorderLayout.NORTH);
frame.add(button2,BorderLayout.WEST);
frame.add(button3,BorderLayout.CENTER);
frame.add(button4,BorderLayout.EAST);
frame.add(button5,BorderLayout.SOUTH);
frame.setBounds(300,200,600,300);
frame.setVisible(true);
frame.setDefaultCloseOperation(JFrame.EXIT_ON_CLOSE);
}
}
|
FlowLayout
1
2
3
4
5
6
7
8
9
10
11
12
13
14
15
16
17
18
19
20
21
22
23
24
25
26
27
28
29
30
31
32
33
34
35
36
37
38
| import javax.swing.JButton;
import javax.swing.JFrame;
import javax.swing.JLabel;
import javax.swing.JPanel;
import java.awt.*;
public class FlowLayoutDemo
{
public static void main(String[] agrs)
{
JFrame jFrame=new JFrame("FlowLayout Demo");
JPanel jPanel=new JPanel();
JButton btn1=new JButton("1");
JButton btn2=new JButton("2");
JButton btn3=new JButton("3");
JButton btn4=new JButton("4");
JButton btn5=new JButton("5");
JButton btn6=new JButton("6");
JButton btn7=new JButton("7");
JButton btn8=new JButton("8");
JButton btn9=new JButton("9");
jPanel.add(btn1);
jPanel.add(btn2);
jPanel.add(btn3);
jPanel.add(btn4);
jPanel.add(btn5);
jPanel.add(btn6);
jPanel.add(btn7);
jPanel.add(btn8);
jPanel.add(btn9);
jPanel.setLayout(new FlowLayout(FlowLayout.LEADING,20,20));
jPanel.setBackground(Color.gray);
jFrame.add(jPanel);
jFrame.setBounds(300,200,300,150);
jFrame.setVisible(true);
jFrame.setDefaultCloseOperation(JFrame.EXIT_ON_CLOSE);
}
}
|
GridLayout
1
2
3
4
5
6
7
8
9
10
11
12
13
14
15
16
17
18
19
20
21
22
23
24
25
26
27
28
29
30
31
32
33
34
35
36
37
| import javax.swing.JButton;
import javax.swing.JFrame;
import javax.swing.JLabel;
import javax.swing.JPanel;
import javax.swing.JTextField;
import java.awt.*;
public class GridLayoutDemo
{
public static void main(String[] args)
{
JFrame frame=new JFrame("GridLayout Demo");
JPanel panel=new JPanel();
panel.setLayout(new GridLayout(4,4,5,5));
panel.add(new JButton("7"));
panel.add(new JButton("8"));
panel.add(new JButton("9"));
panel.add(new JButton("/"));
panel.add(new JButton("4"));
panel.add(new JButton("5"));
panel.add(new JButton("6"));
panel.add(new JButton("*"));
panel.add(new JButton("1"));
panel.add(new JButton("2"));
panel.add(new JButton("3"));
panel.add(new JButton("-"));
panel.add(new JButton("0"));
panel.add(new JButton("."));
panel.add(new JButton("="));
panel.add(new JButton("+"));
frame.add(panel);
frame.setBounds(300,200,200,150);
frame.setVisible(true);
frame.setDefaultCloseOperation(JFrame.EXIT_ON_CLOSE);
}
}
|
登录界面
1
2
3
4
5
6
7
8
9
10
11
12
13
14
15
16
17
18
19
20
21
22
23
24
25
26
27
28
29
30
31
32
33
34
35
36
37
38
39
40
41
42
43
44
45
46
47
48
49
50
51
52
53
54
55
56
57
58
59
60
61
62
63
64
65
66
67
68
69
70
71
72
73
74
75
76
77
78
79
80
81
82
83
84
85
| import javax.swing.JButton;
import javax.swing.JFrame;
import javax.swing.JLabel;
import javax.swing.JPanel;
import javax.swing.JPasswordField;
import javax.swing.JTextField;
public class SwingLoginExample {
public static void main(String[] args) {
JFrame frame = new JFrame("Login Example");
frame.setSize(350, 200);
frame.setDefaultCloseOperation(JFrame.EXIT_ON_CLOSE);
JPanel panel = new JPanel();
frame.add(panel);
placeComponents(panel);
frame.setVisible(true);
}
private static void placeComponents(JPanel panel) {
panel.setLayout(null);
JLabel userLabel = new JLabel("User:");
userLabel.setBounds(10,20,80,25);
panel.add(userLabel);
JTextField userText = new JTextField(20);
userText.setBounds(100,20,165,25);
panel.add(userText);
JLabel passwordLabel = new JLabel("Password:");
passwordLabel.setBounds(10,50,80,25);
panel.add(passwordLabel);
JPasswordField passwordText = new JPasswordField(20);
passwordText.setBounds(100,50,165,25);
panel.add(passwordText);
JButton loginButton = new JButton("login");
loginButton.setBounds(10, 80, 80, 25);
loginButton.addActionListener(new ButtonClickListener());
panel.add(loginButton);
}
private class ButtonClickListener implements ActionListener {
public void actionPerformed(ActionEvent e) {
System.out.click("登录!");
}
}
}
|